The Sweetness of Homemade Donuts: A Heartfelt Recipe
Ah, donuts! Just the thought of them brings back sweet memories, doesn’t it? The fluffy goodness, the tempting glaze, that first warm bite that melts in your mouth—donuts have a special place in the hearts of many. Whether it’s a lazy Sunday morning, a birthday celebration, or simply a treat after a long week, these delightful pastries always seem to elevate the occasion.
But you know what? There’s something even more special about making donuts at home. The aroma wafting through your kitchen, the excitement of waiting for that first batch to finish frying, and the joy of sharing with friends and family—it’s an experience like no other! In this blog post, I’m going to take you step-by-step through my cherished donut recipe, filled with warmth, nostalgia, and little tips from my journey as a home cook.
Let’s dive into the sweet universe of homemade donuts, shall we?
A Sugary Memory: My First Donut Adventure
Growing up, our family had a Saturday morning tradition: donut runs. My dad would scoop my sister and me out of bed with a big grin, then off we’d go, clad in pajamas and fuzzy slippers, to the local donut shop. The air was thick with the smell of frying dough, and I remember waiting with bated breath while dad ordered a box that overflowed with various shapes and sizes. Glazed, chocolate-frosted, sprinkles—the choices felt endless, almost magical!
But the most memorable donut wasn’t purchased, it was homemade! One rainy afternoon, my mom decided to whip up a batch of donuts with us. I still see her measuring out flour with a gentle precision, and the pure joy when we dunked the freshly fried rings into the sugary glaze. Those donuts were not just treats; they were a symbol of togetherness, laughter, and love. From that day on, I knew I wanted to recreate that warmth in my own kitchen.
Gathering Our Ingredients
Now, let’s roll up our sleeves and gather everything we need to make these delicious homemade donuts! Here’s what you’ll require:
- 2 cups all-purpose flour: This is the backbone of our donuts! Feel free to substitute with gluten-free flour if you need a gluten-free option, but be sure to adjust liquid proportions as needed.
- 1/2 cup sugar: For sweetness and that lovely golden hue! You can use brown sugar for a richer flavor or coconut sugar for a less refined option.
- 1 package (2 1/4 tsp) active dry yeast: The magic ingredient! It helps our donuts rise to fluffy perfection. Make sure your yeast is fresh for the best results – no one likes flat donuts!
- 1/4 cup milk: You can use whole milk, almond milk, or any other preferred milk. Remember to warm it slightly to help activate the yeast!
- 1/4 cup water: This provides just the right amount of hydration. If you prefer a richer flavor, consider using buttermilk.
- 2 eggs: These add richness and moisture to our donuts. You can substitute with flax eggs for a vegan option if needed.
- 1/4 cup butter, melted: This adds that lovely buttery flavor. If you want a healthier option, you can substitute with coconut oil or margarine.
- 1/2 tsp salt: Balances out the sweetness and enhances all the flavors. Don’t skip it!
- Vegetable oil for frying: Choose a neutral oil for frying. Canola or peanut oil works well here!
- Powdered sugar or glaze for topping: The final touch! You can get creative here with flavored glazes or simply keep it classic.
With our ingredients ready, it’s time to bring this donut dream to life!
Step-by-Step Instructions: Let’s Make Some Magic!
- Activate the yeast: In a small bowl, combine the warm milk, warm water, and yeast. Stir gently and let it sit for about 5-10 minutes until it becomes foamy. This indicates that the yeast is alive and kicking!
- Combine the dry ingredients: While the yeast is working its magic, in a mixing bowl, whisk together the flour, sugar, and salt. This simple step ensures even distribution of each ingredient.
- Mix the wet and dry ingredients: Once the yeast is frothy, add it to the flour mixture along with the eggs and melted butter. Use a wooden spoon to combine everything until it forms a sticky ball of dough. Chef’s Tip: Don’t be afraid to get your hands in there! A little kneading can help.
- Knead the dough: On a floured surface, knead the dough for about 5-7 minutes until smooth and elastic. This process develops the gluten, which is crucial for that airy texture.
- Let it rise: Place the dough in a lightly greased bowl and cover it with a clean kitchen towel. Let it rise in a warm place for about 1-2 hours, or until it doubles in size. This is where the magic happens, and it smells heavenly!
- Shape the donuts: Once risen, punch down the dough to release air and roll it out to about ½ inch thick. Use a donut cutter (or a glass and a smaller round cutter) to cut out the donuts. Chef’s Hack: Gather the scraps and reroll them to make more donuts!
- Let them rise again: Place the shaped donuts on a greased baking sheet, cover them again, and let them rise for another 30-45 minutes. They’ll puff up beautifully!
- Heat the oil: In a deep skillet or a heavy pot, add about 2-3 inches of vegetable oil, and heat it to around 350°F (175°C). You can test the temperature by dropping a tiny piece of dough in; if it sizzles, you’re ready!
- Fry the donuts: Carefully drop the donuts into the hot oil, frying a few at a time to avoid overcrowding. Fry for about 1-2 minutes per side, until they’re golden brown. Safety Note: Always watch the oil closely—you want that perfect crunch without burning!
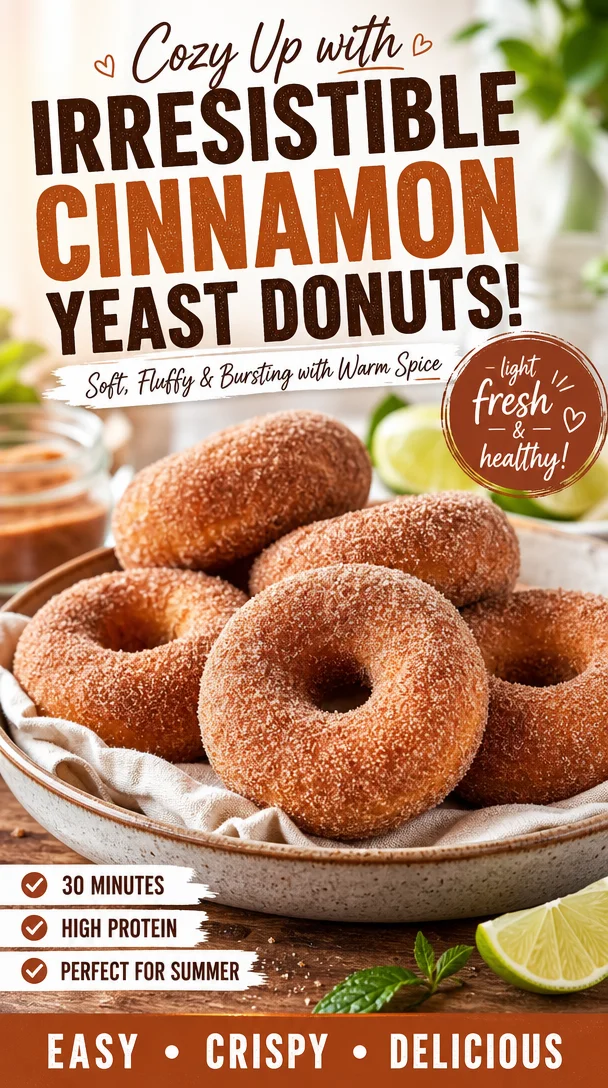
- Drain and glaze: Use a slotted spoon to remove the donuts from the oil and place them on a paper towel to drain. Once slightly cooled, dunk them in powdered sugar or your choice of glaze.
And voilà! You have handmade donuts bursting with flavor and love.
Serving Suggestions: The Perfect Presentation
Presentation is key, right? For a delightful serving, arrange your donuts on a pretty cake stand or platter and dust them lightly with powdered sugar. A drizzle of glaze across the top makes them look ultra-special! Pair with a cup of hot coffee or a glass of cold milk for that classic experience. You could even place a few donuts in a rustic basket lined with parchment paper for an inviting brunch spread.
Recipe Variations: Get Creative!
Feeling adventurous? Here are some fun variations to spice things up:
- Chocolate Glazed: Dip your donuts in a rich chocolate glaze made from melted chocolate and a bit of heavy cream.
- Maple Bacon: After glazing, sprinkle crispy bacon bits on top for that sweet-salty combo most people crave.
- Filled Donuts: Use a piping bag to fill your cooked donuts with pastry cream or jam instead of glazing them.
- Seasonal Spices: For a fall twist, add some cinnamon and nutmeg to the dough, or top with a spiced apple glaze.
- Lemon Zest: Incorporate some lemon zest into your glaze for a refreshing citrus flavor!
Chef’s Notes: A Sweet Journey
I’ve always loved experimenting with donut recipes, and this one is my absolute favorite! It’s tried and true, passed down with a few twists from my own kitchen adventures. I remember the first time I tried adding a maple glaze—I was simply blown away! It’s fantastic how a simple recipe can evolve through trial and creativity.
One day, I even attempted a savory donut! It was filled with cheese and herbs—a glorious culinary mishap that turned out to be a delightful surprise. That’s the beauty of cooking, right? It’s all about the journey, the learning, and sometimes even the unexpected delights.
FAQs and Troubleshooting
- Why are my donuts dense?
- This usually happens if the yeast is inactive or the dough hasn’t risen enough. Make sure to check the date on your yeast, and be patient with the rising times!
- Can I bake these instead of frying?
- Absolutely! Preheat your oven to 375°F (190°C) and place the formed donuts on a baking sheet. Bake for about 15-20 minutes, or until golden. They won’t have the same crispy exterior, but they’ll still taste delicious!
- How do I store leftover donuts?
- Store in an airtight container at room temperature for up to 2 days. For longer storage, freeze them and simply thaw when you’re ready to enjoy!
- What do I do if my dough is too sticky?
- If your dough is too sticky, add a little more flour, a tablespoon at a time, until it reaches the right consistency. Just be careful not to overdo it!
Nutritional Info
While homemade donuts are definitely a treat, they can be enjoyed in moderation as part of a balanced diet. Each donut (without glaze) holds approximately 200 calories. Remember, the joy of baking and sharing outweighs the numbers on the scale!
And there you have it! A heartfelt journey through homemade donuts, complete with love, tips, and a sprinkle of magic. I hope you feel inspired to get cooking and create sweet memories in your kitchen just like I did. So, let’s lace up those aprons and dive into this delicious adventure together! Happy frying! 🍩❤️
PrintHomemade Donuts

Delightful homemade donuts, fluffy and sweet, perfect for any occasion.
- Prep Time: 15 minutes
- Cook Time: 30 minutes
- Total Time: 45 minutes
- Yield: 12 servings 1x
- Category: Dessert
- Method: Frying
- Cuisine: American
- Diet: Vegetarian
Ingredients
- 2 cups all-purpose flour
- 1/2 cup sugar
- 1 package (2 1/4 tsp) active dry yeast
- 1/4 cup milk
- 1/4 cup water
- 2 eggs
- 1/4 cup butter, melted
- 1/2 tsp salt
- Vegetable oil for frying
- Powdered sugar or glaze for topping
Instructions
- Activate the yeast: In a small bowl, combine the warm milk, warm water, and yeast. Stir gently and let it sit for about 5-10 minutes until it becomes foamy.
- Combine the dry ingredients: In a mixing bowl, whisk together the flour, sugar, and salt.
- Mix the wet and dry ingredients: Once the yeast is frothy, add it to the flour mixture along with the eggs and melted butter. Combine until it forms a sticky ball of dough.
- Knead the dough: On a floured surface, knead for about 5-7 minutes until smooth and elastic.
- Let it rise: Place the dough in a lightly greased bowl and cover it. Let it rise for about 1-2 hours until doubled in size.
- Shape the donuts: Roll the risen dough out to about ½ inch thick and cut out donuts.
- Let them rise again: Place on a greased baking sheet, cover, and let rise for another 30-45 minutes.
- Heat the oil: In a deep skillet, heat vegetable oil to around 350°F (175°C).
- Fry the donuts: Carefully drop the donuts into the hot oil, frying for about 1-2 minutes per side until golden brown.
- Drain and glaze: Remove from oil and place on paper towels. Dunk in powdered sugar or glaze once slightly cooled.
Notes
Store leftover donuts in an airtight container at room temperature for up to 2 days.
Nutrition
- Serving Size: 1 donut
- Calories: 200
- Sugar: 5g
- Sodium: 100mg
- Fat: 10g
- Saturated Fat: 4g
- Unsaturated Fat: 5g
- Trans Fat: 0g
- Carbohydrates: 25g
- Fiber: 1g
- Protein: 3g
- Cholesterol: 30mg
Keywords: donuts, homemade, dessert, fried, sweet