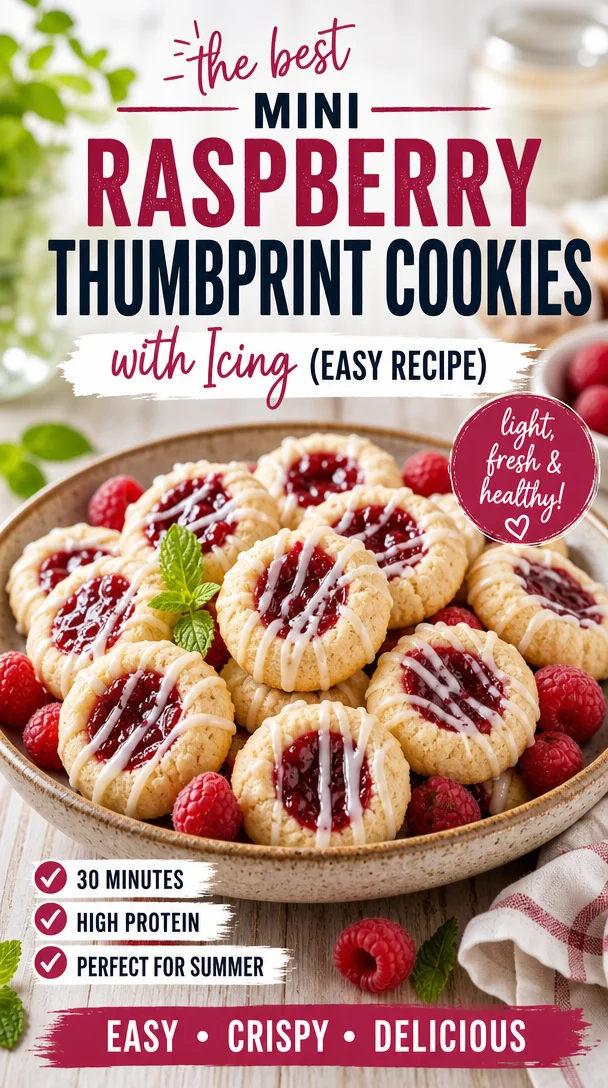
Raspberry Thumbprint Cookies with Icing: A Sweet Journey
Hello, my fellow food lovers! It’s Maddie Brooks here, and I’m thrilled you’ve joined me in the Hearthful Kitchen today. Let’s dive into a cookie recipe that will make your heart sing: Raspberry Thumbprint Cookies with Icing! These delightful cookies are perfect for any occasion—whether it’s a casual get-together or you need a sweet pick-me-up on a rainy day. Trust me; once you take a bite, you’ll feel the warmth and love that goes into every cookie.
A Bashful Baker’s Tale
Growing up, my grandmother was the queen of the kitchen. Whenever we visited her, we were treated to the enchanting aromas of freshly baked goods wafting through the house. One particular memory stands out like a cherished photograph: the day she taught me how to make her famous thumbprint cookies. We used to giggle as we rolled the dough, formed those delightful little indents, and filled them with the juiciest raspberry jam. The excitement of watching them bake, and then the heavenly moment when we finally could taste the fruits (literally!) of our labor—it was magic!
Those special afternoons with Grandma ignited my love for baking and the joy of creating food that brings people together. Today, I’m excited to share my version of her thumbprint cookies—still packed with flavor and that nostalgic touch, but simplified for our busy lives. Let’s start baking!
Ingredients
To whip up these Raspberry Thumbprint Cookies, gather the following ingredients:
-
1 cup unsalted butter, softened
This is your cookie base. Unsalted butter allows you to control the salt level in your recipe. If you’re in a pinch, you can substitute it with margarine or a plant-based butter alternative! -
1 cup granulated sugar
For sweetness! If you want to reduce the sugar a bit, coconut sugar is a great substitute for a lower glycemic index. -
2 large eggs
Eggs bind your dough together. If you’re vegan or egg-free, you can use flax eggs (1 tablespoon ground flaxseed mixed with 3 tablespoons water for each egg). -
2 teaspoons vanilla extract
This adds a warm, inviting flavor. For an exciting twist, try almond extract instead! -
2 cups all-purpose flour
The backbone of your cookie dough! If you’re looking for a gluten-free option, you can use a 1:1 gluten-free flour blend that contains xanthan gum. -
1/2 teaspoon salt
Balances the sweetness of your cookies. If you’re on a low-sodium diet, just a pinch will do! -
1/2 cup raspberry jam
The star of the show! Feel free to swap in other jams or preserves if raspberry isn’t your jam—pun intended! -
1 cup powdered sugar
Used for the icing that gives your cookies that extra oomph! You can make your own by blending granulated sugar until it’s a fine powder. -
2 tablespoons milk or water
This will help make your icing the perfect consistency. For a dairy-free option, use almond milk or another plant-based milk. -
1 teaspoon vanilla extract for icing
A flavor enhancer to take your icing to the next level.
Step-by-Step Instructions
-
Preheat Your Oven
Begin by preheating your oven to 350°F (175°C). This is important to ensure that your cookies bake evenly and come out perfectly golden. -
Cream the Butter and Sugar
In a large mixing bowl, cream together the softened butter and granulated sugar until it’s light and fluffy—this usually takes about 3-5 minutes. A little tip? Make sure your butter is at room temperature for the best results! -
Add the Eggs and Vanilla
Beat in the eggs one at a time, ensuring each is fully incorporated before adding the next. Then stir in the vanilla extract. You’ll notice the mixture turning creamy and smooth; that’s the magic happening! -
Combine the Dry Ingredients
In a separate bowl, whisk together the all-purpose flour and salt. Gradually add this dry mixture to the wet ingredients, mixing until just combined. Overmixing can lead to tough cookies, and nobody wants that! -
Form the Cookies
Roll the dough into 1-inch balls and place them on a cookie sheet lined with parchment paper. With your thumb (or the back of a measuring spoon), gently press down in the center of each ball to make the signature thumbprint. -
Fill with Raspberry Jam
Drop about 1/2 teaspoon of raspberry jam into each thumbprint. This is where the cookies become truly special! -
Bake
Bake in your preheated oven for 12-15 minutes, or until the edges are lightly golden. Don’t worry if they puff up a bit—the indent will reappear as they cool. -
Cool Down
Remove the cookies from the oven and let them cool on the baking sheet for about 5 minutes before transferring them to wire racks to cool completely. Patience is key here, my friends! -
Make the Icing
While your cookies cool, mix powdered sugar, milk (or water), and vanilla extract in a bowl until smooth. If you find the icing too thick, just add a splash more milk to reach your desired consistency. -
Drizzle and Decorate
Once the cookies are completely cool, drizzle your icing over the tops. You can use a fork or a piping bag for a more precise touch—or just go wild and let the icing flow!
Serving Suggestions
These Raspberry Thumbprint Cookies are not just a treat; they’re also a beautiful addition to any dessert platter. Serve them on a cake stand or sprinkle with a little powdered sugar for an elegant touch. Pair them with a cup of steaming tea or coffee for that perfect afternoon snack. They also make charming gifts wrapped in a cute box or tied with a ribbon!
Recipe Variations
- Different Jams or Preserves: Swap out raspberry jam for strawberry, apricot, or even lemon curd for a zesty twist!
- Nutty Toppings: Sprinkle chopped nuts or coconut on top of the jam before baking for added texture and flavor.
- Chocolate Drizzle: Instead of icing, melt some chocolate and drizzle over the cookies for a chocolaty delight!
- Herbal Infusion: Add a hint of fresh lemon zest or mint to the dough for an aromatic touch.
- Vegan Option: Use flax eggs, coconut oil instead of butter, and plant-based milk for icing to create a delicious vegan thumbprint.
Chef’s Notes
These cookies have a special place in my heart, not just because of their delightful taste but because they represent time spent with loved ones in the kitchen. Over the years, I’ve experimented with different fillings, and one of my favorite variations is using homemade berry preserves. It adds a whole new layer of flavor!
I remember one holiday season, I got a bit ambitious and decided to make a massive batch—let’s just say there were thumbprint cookies in every corner of the kitchen! They became the star of our holiday parties and always vanished within minutes.
FAQs and Troubleshooting
1. Why are my cookies not spreading?
If your cookies aren’t spreading out, it could be due to overmixing or using cold butter instead of softened butter. Ensure you’re following the steps closely, and give all ingredients a good chance to soften and meld together.
2. My jam leaked out during baking! What went wrong?
It’s essential not to overfill the thumbprint. Stick with about 1/2 teaspoon of jam for each cookie. If you use too much, it can overflow when baking.
3. How can I store these cookies?
Keep your cookies in an airtight container at room temperature for up to a week (if they last that long!). For longer storage, refrigerate them for up to two weeks or freeze for up to three months.
4. Can I freeze the dough?
Absolutely! You can freeze the cookie dough rolled into balls, just thaw them in the fridge before baking. When you’re ready to bake, create the thumbprints and fill them with jam as directed.
Nutritional Info
While I encourage indulging in these cookies occasionally, it’s good to know what you’re enjoying. Each raspberry thumbprint cookie has approximately:
- Calories: 120
- Total Fat: 6g
- Saturated Fat: 4g
- Carbohydrates: 16g
- Sugar: 8g
- Protein: 1g
That’s enough for an energy boost, especially when paired with a warm cup of tea or coffee!
So what are you waiting for? Gather your ingredients, preheat that oven, and embark on this delicious baking adventure! I couldn’t be more excited for you to experience the joy these Raspberry Thumbprint Cookies bring. Your friends and family will adore the cozy moments created over a batch of these cheerful cookies. Until next time, happy baking!
PrintRaspberry Thumbprint Cookies with Icing

Delightful raspberry thumbprint cookies, perfect for any occasion, with a sweet icing drizzle.
- Prep Time: 15 minutes
- Cook Time: 15 minutes
- Total Time: 30 minutes
- Yield: 24 servings 1x
- Category: Dessert
- Method: Baking
- Cuisine: American
- Diet: Vegetarian
Ingredients
- 1 cup unsalted butter, softened
- 1 cup granulated sugar
- 2 large eggs
- 2 teaspoons vanilla extract
- 2 cups all-purpose flour
- 1/2 teaspoon salt
- 1/2 cup raspberry jam
- 1 cup powdered sugar
- 2 tablespoons milk or water
- 1 teaspoon vanilla extract for icing
Instructions
- Preheat the oven to 350°F (175°C).
- Cream the butter and sugar until light and fluffy.
- Add the eggs one at a time and then stir in the vanilla extract.
- Combine the flour and salt in a separate bowl, then mix into the wet ingredients.
- Form the dough into 1-inch balls and create thumbprints in the center.
- Fill each thumbprint with about 1/2 teaspoon of raspberry jam.
- Bake for 12-15 minutes until edges are golden.
- Cool on the baking sheet for 5 minutes, then transfer to wire racks.
- Make the icing by blending powdered sugar, milk, and vanilla until smooth.
- Drizzle the icing over the cooled cookies.
Notes
Store cookies in an airtight container at room temperature for up to a week, or freeze for longer storage.
Nutrition
- Serving Size: 1 cookie
- Calories: 120
- Sugar: 8g
- Sodium: 100mg
- Fat: 6g
- Saturated Fat: 4g
- Unsaturated Fat: 2g
- Trans Fat: 0g
- Carbohydrates: 16g
- Fiber: 0g
- Protein: 1g
- Cholesterol: 30mg
Keywords: cookies, raspberry, thumbprint, dessert, baking