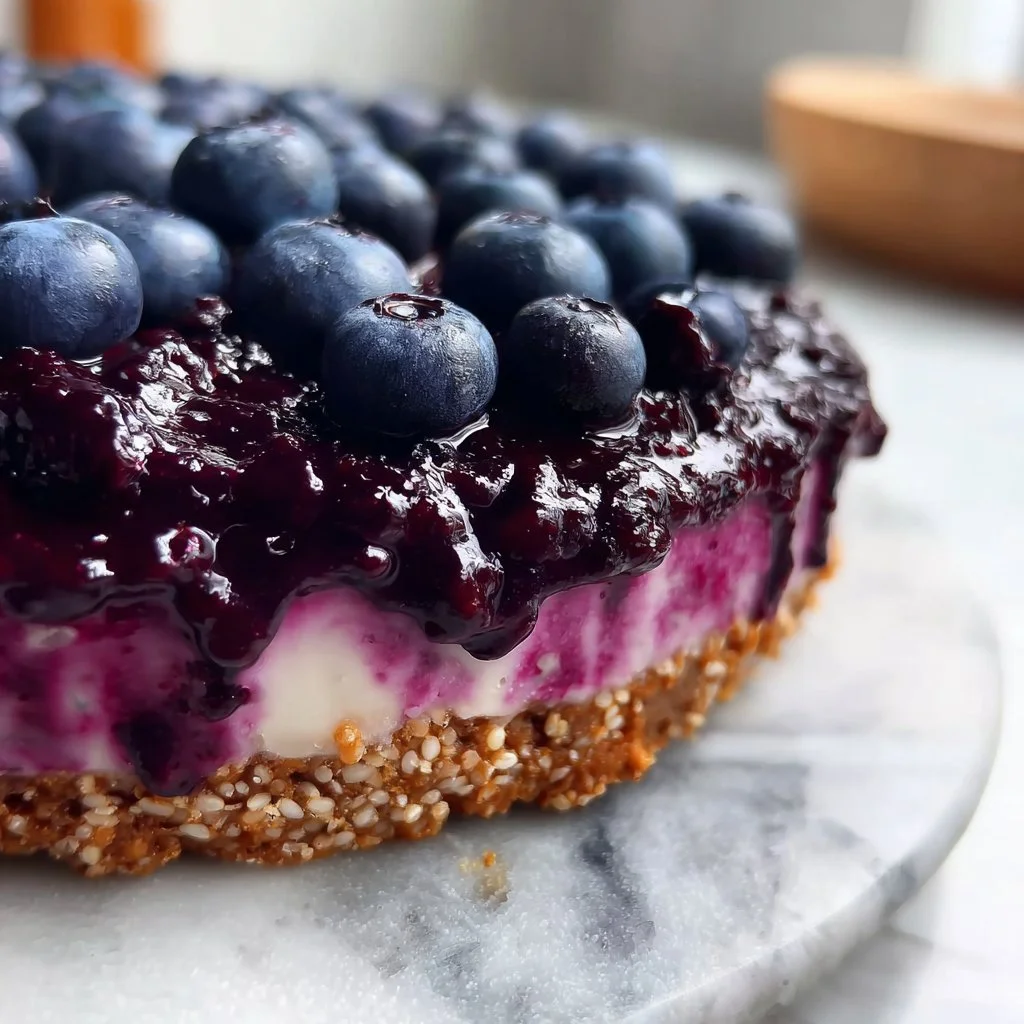
# Nourishing No-Bake Blueberry Cheesecake with Date-Sweetened Crust

Welcome to Hearthful Kitchen! Today, I'm excited to share a recipe that’s not only easy to make but also bursts with flavor and nostalgia: a Nourishing No-Bake Blueberry Cheesecake with a Date-Sweetened Crust. This dessert is a celebration of simplicity and comfort, combining a creamy, dreamy filling with a naturally sweet and crumbly crust made from wholesome ingredients. Perfect for warm days when the thought of turning on the oven sounds unbearable—and let's face it, who doesn't love a dessert that doesn’t require baking?

What makes this cheesecake even more special is its rich history in my kitchen. As I stirred the creamy filling and watched the vibrant blueberries dance together in that luscious sauce, I was transported back to my childhood summers spent picking wild berries with my family. Those moments, filled with laughter, sun-kissed skin, and the joyful pursuit of sweet treasures, shaped my love for cooking and sharing food with the people I love.

## Personal Story

One of my fondest memories revolves around a summer tradition with my grandmother—a ritual as essential as the berries themselves. Every Friday, we would don our aprons and set out on our bikes, ready to conquer the nearby berry patch. The air was always fragrant with the sweet aroma of ripe fruits, and I can still picture how we filled our baskets to the brim, giggling as we raced to see who could find the biggest berry.

She would then take those berries home to create the most delightful pies and desserts, teaching me the magic of cooking with fresh ingredients. The aroma of her desserts baking in the oven was like a warm hug, wrapping around our home and making every meal feel special. But as much as I loved those traditional treats, I also yearned for a healthier twist for my own family gatherings. Thus, this no-bake cheesecake recipe was born—combining my nostalgia with nutrition, and oh, how it brings smiles at every occasion!

## Ingredients

### For the Crust:
- **1 ½ cups gluten-free oats**
  *Oats are the foundation of the crust, giving it a hearty texture. Be sure to use certified gluten-free oats if you're sensitive.*

- **1 cup Medjool dates (pitted)**
  *These natural sweeteners add richness. If they seem too firm, soak them in warm water for 10 minutes to soften.*

- **2 tbsp coconut oil (melted)**
  *Coconut oil helps bind the crust together. Feel free to substitute with melted vegan butter for a different flavor profile!*

- **Pinch of sea salt**
  *A little pinch enhances the sweetness and draws out the other flavors beautifully.*

- **1 tsp vanilla extract**
  *This fragrant ingredient rounds out the flavor—try using pure vanilla extract for the best results!*

### For the Blueberry Jam:
- **2 ½ cups fresh or frozen blueberries**
  *Use whatever you have! Fresh berries will yield a brighter flavor, but frozen work just as well—perfect for any season.*

- **2 tbsp maple syrup (or more to taste)**
  *Adjust to your sweetness preference; I love a touch more sweetness as the berries can be tangy.*

- **1 tbsp fresh lemon juice**
  *The acidity of lemon juice brightens the jam and balances the sweetness of the blueberries.*

- **½ tsp vanilla extract**
  *Adds depth to the blueberry jam—feel free to add this in while it simmers for an aromatic touch!*

- **1 tsp tapioca starch or arrowroot powder (mixed with 1 tsp water for thickening)**
  *This is a natural thickener; it thickens beautifully without altering the flavor. It’s like magic!*

- **¼ cup water**
  *To help break down the blueberries and create that luscious jam texture!*

### For the Filling:
- **20 ounces vegan cream cheese (room temperature)**
  *I love Kite Hill’s variety; it has the perfect creaminess! Make sure it’s at room temperature to blend easily.*

- **⅓ cup maple syrup (adjust to taste)**
  *Sweeten to your liking—this dessert is all about balance!*

- **1 tsp vanilla bean paste or extract**
  *Vanilla bean paste has little flecks of vanilla that add a gourmet touch. Perfection in every bite!*

- **1 tbsp fresh lemon juice**
  *Another dash of acid to brighten up the filling! This contrasts beautifully with the sweet blueberry topping.*

- **½ cup of the prepared blueberry jam**
  *This becomes a rich swirl in your filling—delicious!*

- **Extra blueberry jam for topping**
  *An optional but highly recommended finishing touch for that gorgeous presentation!*

## Step-by-Step Instructions

Now that we're all set, let's dive into the fun part—making this delightful cheesecake!

### Step 1: Make the Crust
1. **Blend the Oats:** In a food processor, add the gluten-free oats and pulse until they resemble breadcrumb consistency. You want a fine, sandy texture to create a sturdy base.

2. **Incorporate Dates:** Next, add the pitted Medjool dates, melted coconut oil, sea salt, and vanilla extract. Pulse until the mixture comes together and starts to clump. If it seems dry, add a splash of water or another date to reach the right consistency.

3. **Press Into Pan:** Line the bottom of a springform pan with parchment paper for easy removal. Spoon the mixture into the pan and press it firmly into the bottom and slightly up the sides. You want to create a solid layer to hold all that creamy filling!

4. **Chill the Crust:** Place the crust in the fridge to firm up while you make the filling and blueberry jam.

### Step 2: Prepare the Blueberry Jam
1. **Cook the Blueberries:** In a medium saucepan over medium heat, combine the blueberries, maple syrup, lemon juice, vanilla extract, water, and tapioca starch mixture. Stir gently to combine.

2. **Simmer:** Allow the mixture to come to a gentle simmer. Keep stirring until the blueberries start to break down and the mixture thickens, about 5-8 minutes. This jam will be bursting with flavor and color!

3. **Cool:** Once thickened, remove it from the heat and let it cool while you prepare the filling.

### Step 3: Make the Cream Cheese Filling
1. **Blend the Cream Cheese:** In a large mixing bowl, use an electric mixer or food processor to blend the room-temperature vegan cream cheese until creamy and smooth. This is where the magic begins—so dreamy!

2. **Add Sweetness:** Mix in the maple syrup, vanilla bean paste, and lemon juice. Blend until everything is well combined and fluffy.

3. **Combine with Blueberry Jam:** Gently fold in ½ cup of the cooled blueberry jam into the cream cheese mixture. You want to create swirls rather than fully mixing—it’ll be so pretty!

### Step 4: Assemble the Cheesecake
1. **Layer the Filling:** Pour the cream cheese mixture on top of the chilled crust. Use a spatula to smooth the top.

2. **Refrigerate:** Cover the cheesecake loosely with plastic wrap, and chill it in the refrigerator for at least 4-6 hours, or overnight—this allows the flavors to meld beautifully.

3. **Top with Jam:** Once set, spread extra blueberry jam on top for a garnish. This adds a vibrant pop of color and makes your cheesecake look like a showstopper!

## Serving Suggestions

When it’s time to serve this beauty, carefully release the springform pan and slice it into wedges or squares. Place each piece on a plate, and for a touch of elegance, drizzle some extra blueberry jam over the top or serve with a dollop of whipped coconut cream. A sprinkle of fresh mint leaves can add a lovely touch of color and freshness alongside the sweet, creamy cheesecake.

## Recipe Variations

Feel like getting creative? Here are a few twists you can try:
- **Add Lemon Zest:** To brighten up the filling, try adding a teaspoon of lemon zest for an invigorating citrus note.
- **Nutty Crust:** Mix in ½ cup of finely chopped nuts like pecans or almonds into the crust for added texture and flavor.
- **Different Berry Jam:** Swap the blueberries for raspberries or strawberries for a different flavor profile.
- **Chocolatey Delight:** Add melting vegan chocolate into the filling for a more indulgent dessert.
- **Sugar-Free Option:** Use date syrup or stevia to sweeten your filling if you’re cutting back on sugars.

## Chef’s Notes

Every time I make this cheesecake, I’m reminded of those berry-picking adventures and the absolute joy of sharing food with loved ones. Honestly, one of my earlier attempts at making this recipe went awry when I accidentally grabbed salt instead of sugar for the filling! Though the flavor was certainly interesting, it was a learning moment and a reminder to always check ingredients twice.

This recipe has evolved over the years, but what has remained is the heart behind it—creating a dish that brings people together, celebrating the small moments where love is shared over good food. Each bite of this cheesecake brings a bit of sunshine, and I have no doubt it’ll do the same in your kitchen!

## FAQs and Troubleshooting

**What if my crust crumbles when sliced?**
Ensure you press the crust down firmly and let it chill for enough time. If it still crumbles, you may need to add a bit more melted coconut oil to help bind it.

**Can I freeze this cheesecake?**
Yes! You can freeze it for up to 2-3 months. Just ensure it's wrapped well to prevent freezer burn. Thaw it in the fridge overnight before serving.

**What if my filling is too runny?**
If your filling doesn't set, it may not have chilled long enough. You can mix in a bit more tapioca starch next time or try refrigerating it longer.

**Can I use regular cream cheese instead of vegan?**
Absolutely! If you’re not following a vegan diet, regular cream cheese will work just fine—it’ll have a richer flavor but check for a gluten-free option if needed.

## Nutritional Info

*(Note: Nutritional values will vary based on portion size and specific ingredients used, but here’s a rough estimate per slice based on 12 slices)*
- Calories: Approximately 250
- Protein: 4g
- Carbohydrates: 30g
- Fat: 14g
- Fiber: 3g
- Sugar: 10g

---

That’s it! I hope you enjoy making this Nourishing No-Bake Blueberry Cheesecake as much as I do. Remember, the kitchen is a place of love and laughter; let these moments be a delicious reflection of that! Happy cooking!
Nourishing No-Bake Blueberry Cheesecake with Date-Sweetened Crust
A flavorful, easy-to-make no-bake cheesecake featuring a creamy filling and a natural sweet date-sweetened crust, perfect for warm days.
- Prep Time: 15 minutes
- Cook Time: 15 minutes
- Total Time: 360 minutes
- Yield: 12 servings 1x
- Category: Dessert
- Method: No-Bake
- Cuisine: American
- Diet: Vegan
Ingredients
Scale
- 1 ½ cups gluten-free oats
- 1 cup Medjool dates (pitted)
- 2 tbsp coconut oil (melted)
- Pinch of sea salt
- 1 tsp vanilla extract
- 2 ½ cups fresh or frozen blueberries
- 2 tbsp maple syrup (or more to taste)
- 1 tbsp fresh lemon juice
- ½ tsp vanilla extract
- 1 tsp tapioca starch (mixed with 1 tsp water)
- ¼ cup water
- 20 ounces vegan cream cheese (room temperature)
- ⅓ cup maple syrup (adjust to taste)
- 1 tsp vanilla bean paste or extract
- 1 tbsp fresh lemon juice
- ½ cup of the prepared blueberry jam
- Extra blueberry jam for topping
Instructions
- Blend the oats in a food processor until they resemble breadcrumb consistency.
- Incorporate the pitted Medjool dates, melted coconut oil, sea salt, and vanilla extract. Pulse until the mixture clumps together.
- Press the mixture into a lined springform pan firmly.
- Chill the crust in the fridge while preparing the filling and jam.
- Cook the blueberries with maple syrup, lemon juice, vanilla extract, water, and tapioca starch in a saucepan.
- Simmer until the mixture thickens, about 5-8 minutes.
- Cool the mixture before preparing the filling.
- Blend the melted cream cheese until smooth in a large bowl.
- Add maple syrup, vanilla bean paste, and lemon juice; mix until fluffy.
- Combine with cooled blueberry jam, folding gently to create swirls.
- Layer the filling onto the chilled crust and smooth the top.
- Refrigerate for at least 4-6 hours or overnight.
- Top with extra blueberry jam before serving.
Notes
Press the crust firmly to ensure it holds together. Add extra jam for decoration when serving.
Nutrition
- Serving Size: 1 slice
- Calories: 250
- Sugar: 10g
- Sodium: 50mg
- Fat: 14g
- Saturated Fat: 7g
- Unsaturated Fat: 5g
- Trans Fat: 0g
- Carbohydrates: 30g
- Fiber: 3g
- Protein: 4g
- Cholesterol: 0mg
Keywords: no-bake cheesecake, blueberry dessert, vegan cheesecake, healthy dessert, gluten-free dessert
Categories: