Philly No-Bake Mini Cheesecakes: A Slice of Joy You Can Make at Home
Hey friends! Welcome back to Hearthful Kitchen! Today, I’m thrilled to share a dessert that brings an island of joy right to your table: Philadelphia No-Bake Mini Cheesecakes. Trust me, these little bites of heaven are not only delicious but also super easy to whip up! I mean, who can resist a creamy cheesecake topped with luscious berries or a drizzle of pie filling? These beauties are perfect for a summer gathering, a cozy dinner, or just because you deserve a treat.
What I love about these mini cheesecakes is the nostalgia they bring. Growing up, my family would gather around dinners where desserts were the highlight of the evening—the finale to our culinary symphony. Each bite was an experience, a delicious reminder of how food can bring people together. With these mini cheesecakes, you can replicate that same magic in your own kitchen!
And the best part? No oven required! Say goodbye to the hours of baking and let’s dive into these no-bake delights. You’ll impress your friends and family with your culinary skills without breaking a sweat. So, grab your apron and let’s get started!
Personal Story
I have fond memories attached to cheesecakes. It all began the summer I turned twelve. My grandma, who I fondly called Nanny, made the most delectable cheesecakes. They didn’t just look gorgeous; they sparkled with flavors like vanilla, lemon, and sometimes, even chocolate! One summer evening, we decided to try making a cheesecake together. I remember the two of us standing side by side in her warm, aromatic kitchen, giggling over spilled sugar and melted chocolate.
That day, we spent hours playing around with flavors and discussing which toppings were essential (spoiler alert: it was everything!). Nanny taught me the art of balance—the delicate dance between creaminess and sweetness. Although her cheesecakes took hours to bake and set, I learned a lot about the love and care that goes into cooking.
Fast forward to today, and those cherished memories continue to influence my culinary journey. With these no-bake mini cheesecakes, I wanted to capture that same spirit of fun and togetherness, making it easy for everyone to recreate at home. This is more than just a recipe—it’s a chance to share laughter, love, and maybe even a few kitchen disasters along the way!
Ingredients
Here’s everything you’ll need to create these delightful mini cheesecakes:
-
8 oz Cream Cheese, softened
This is the star ingredient! Make sure it’s at room temperature so it blends smoothly. If you want a lighter version, you can substitute it with whipped cream cheese! -
1/2 cup Powdered Sugar
This adds sweetness and gives the cheesecake that delightful melt-in-your-mouth texture. If you’re looking for a healthier option, you can use agave syrup or monk fruit sweetener instead. -
1 tsp Vanilla Extract
Vanilla adds that lovely depth of flavor. You can enhance the taste by using vanilla bean paste or even almond extract for a twist. -
1 cup Whipped Topping
Lightens the cheesecake and gives it a fluffy texture! You can opt for homemade whipped cream if you prefer, just make sure it’s stabilized. -
1 cup Graham Cracker Crumbs
This will provide the crust that makes these cheesecakes so special. You can easily substitute with crushed cookies like Oreos or even gluten-free options. -
1/4 cup Unsalted Butter, melted
This helps to bind the graham cracker crumbs together. If you want to go a step healthier, coconut oil can be an awesome substitute. -
Fresh Fruit or Pie Filling for Topping (optional)
Fresh strawberries, blueberries, or cherries make beautiful toppings, or go for your favorite pie filling. The options are really endless!
Step-by-Step Instructions
Let’s make that mini cheesecake magic happen! Follow these steps, and you’ll have a glorious dessert that your family will gladly devour.
1. Prepare the Crust
-
Combine ingredients: In a medium mixing bowl, combine 1 cup of graham cracker crumbs and 1/4 cup of melted butter.
Tip: If you like your crust a bit sweeter, add in a tablespoon of sugar here! -
Mix well: Use a fork to mix until the texture resembles wet sand. It should hold together when you squeeze it in your hand.
-
Distribute into cups: Take your favorite mini dessert cups or muffin tins and scoop about 2 tablespoons of the crust mixture into each.
Tip: Press it down firmly with the back of a spoon or your hands to create a strong base. -
Chill: Place in the refrigerator to firm up while we prepare our cheesecake filling—about 30 minutes will do!
2. Make the Cheesecake Filling
-
Beat the cream cheese: In a large bowl, add 8 oz of softened cream cheese. Using an electric mixer, beat until it’s creamy and smooth.
Chef Hack: Make sure there are no lumps for that velvety texture! -
Add powdered sugar: Gradually mix in 1/2 cup of powdered sugar and continue to beat until well incorporated.
Tip: Taste along the way—if you prefer it sweeter, feel free to add more sugar. -
Stir in vanilla: Pour in 1 tsp of vanilla extract and mix once more until the flavor is fully distributed.
-
Fold in whipped topping: Gently fold in 1 cup of whipped topping using a spatula, until it’s nicely combined and fluffy.
Pro Tip: Don’t overmix here; we want that light, airy texture!
3. Assemble the Cheesecakes
-
Fill the crusts: Spoon the cheesecake mixture on top of the chilled graham cracker crusts, filling them generously.
Tip: Use a piping bag for a beautifully neat finish, or simply spread it evenly with a spatula. -
Smooth the tops: With the back of a spoon or a spatula, gently smooth out the tops for a polished appearance.
-
Chill again: Cover with plastic wrap and return them to the refrigerator for at least 3 hours, or until set completely.
Chef Insight: For the best texture, let them chill overnight. The flavors will have time to meld beautifully!
4. Serve the Mini Cheesecakes
-
Add toppings: Right before serving, add your favorite toppings—whether it’s a dollop of fresh whipped cream, a handful of berries, or a spoonful of cherry pie filling.
Presentation Tip: Top each one with a mint leaf for a pop of color! -
Dig in: Grab a fork and serve! Each bite should be creamy, light, and bursting with flavor.
Recipe Variations
-
Chocolate Lovers: Mix in some melted chocolate or cocoa powder to the cheesecake filling for a chocolaty twist.
-
Lemon Zest: Add the zest of a lemon for a refreshing citrus flavor. Pair with fresh strawberries for a great topping!
-
Nutty Crust: Swap half of the graham cracker crumbs for finely chopped nuts like pecans or almonds for a delightful crunch.
-
Savory Option: Use a savory herb cream cheese and top with roasted vegetables for an unexpected appetizer!
-
Vegan Version: Replace cream cheese with vegan cream cheese, use coconut whipped cream for topping, and make a crust with crushed dates and nuts for a healthier twist.
Chef’s Notes
I adore how this recipe has evolved over time! Initially, I made these mini cheesecakes as decadent desserts for big family gatherings, but as I began experimenting, I discovered ways to adapt them for seasons and special occasions. From holiday flavors to lighter, fresher takes, each cheesecake embodies warmth and comfort.
Funny enough, I once forgot to add the powdered sugar because I was caught up in a conversation with a friend. Let’s just say, that taste test was quite a surprise! Now, I always double-check my ingredients list before diving in.
These mini cheesecakes truly reflect a blend of nostalgia and creativity. They are simple yet sophisticated enough for any occasion, from casual weeknight treats to festive gatherings.
FAQs and Troubleshooting
-
What if my cheesecakes don’t set?
- Make sure to use softened cream cheese and allow sufficient chill time. If they aren’t firm enough after chilling, they may need longer or a little more whipped topping!
-
Can I use different pans?
- Absolutely! Mini muffin tins or even silicone molds work great! Just adjust the crust and filling amounts to fit your chosen vessel.
-
How long do they last?
- These mini cheesecakes can be kept in the refrigerator for about 3-4 days. Just make sure to cover them well!
-
Can I freeze them?
- Yes, but keep in mind it may alter the texture a bit. If you want to freeze them, do so before adding any toppings.
Nutritional Info (optional)
- Serving: 1 mini cheesecake (without toppings)
- Calories: ~150 (dependent on exact ingredient substitutions)
- Total Fat: 9g
- Saturated Fat: 5g
- Carbohydrates: 16g
- Sugars: 8g
- Protein: 2g
So there you have it—deliciously easy Philadelphia No-Bake Mini Cheesecakes that bring the warmth and joy of the kitchen right into your home. With every bite, you’ll be reminded of cherished moments and the beauty of sharing meaningful meals with loved ones. I can’t wait to see how yours turn out! Happy cooking and even happier sharing from Hearthful Kitchen! 🧁❤️
PrintPhilly No-Bake Mini Cheesecakes
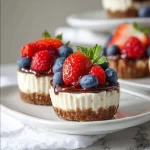
Delicious and easy no-bake mini cheesecakes topped with fresh berries or pie filling, perfect for any occasion.
- Prep Time: 15 minutes
- Cook Time: 0 minutes
- Total Time: 195 minutes
- Yield: 12 servings 1x
- Category: Dessert
- Method: No-Bake
- Cuisine: American
- Diet: Vegetarian
Ingredients
- 8 oz Cream Cheese, softened
- 1/2 cup Powdered Sugar
- 1 tsp Vanilla Extract
- 1 cup Whipped Topping
- 1 cup Graham Cracker Crumbs
- 1/4 cup Unsalted Butter, melted
- Fresh Fruit or Pie Filling for Topping (optional)
Instructions
- Combine ingredients: In a medium mixing bowl, combine the graham cracker crumbs and melted butter.
- Mix well: Use a fork to mix until the texture resembles wet sand.
- Distribute into cups: Scoop about 2 tablespoons of the crust mixture into each mini dessert cup or muffin tin.
- Chill: Place in the refrigerator for about 30 minutes.
- Beat the cream cheese: In a large bowl, beat the softened cream cheese until creamy and smooth.
- Add powdered sugar: Gradually mix in the powdered sugar and continue to beat until well incorporated.
- Stir in vanilla: Pour in vanilla extract and mix until fully distributed.
- Fold in whipped topping: Gently fold in the whipped topping until nicely combined.
- Fill the crusts: Spoon the cheesecake mixture on top of the chilled crusts.
- Smooth the tops: Use a spoon or spatula to gently smooth out the tops.
- Chill again: Cover and return to the refrigerator for at least 3 hours.
- Add toppings: Right before serving, add your favorite toppings.
- Dig in: Serve and enjoy!
Notes
These mini cheesecakes can be kept in the refrigerator for about 3-4 days and can also be frozen before adding toppings.
Nutrition
- Serving Size: 1 serving
- Calories: 150
- Sugar: 8g
- Sodium: 180mg
- Fat: 9g
- Saturated Fat: 5g
- Unsaturated Fat: 3g
- Trans Fat: 0g
- Carbohydrates: 16g
- Fiber: 1g
- Protein: 2g
- Cholesterol: 30mg
Keywords: cheesecake, no-bake dessert, mini cheesecakes, easy dessert, summer treats