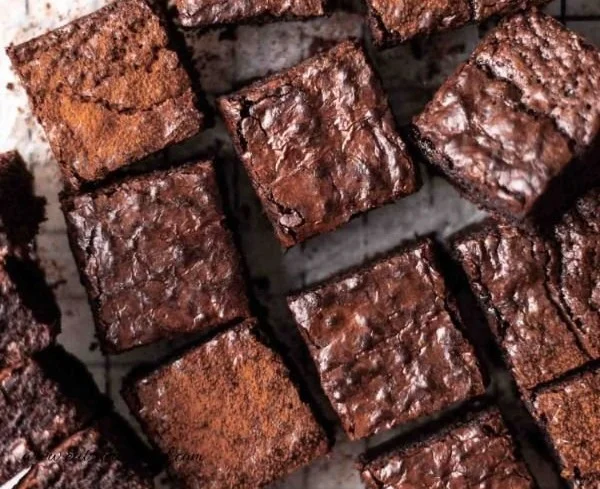
Heavenly Homemade Brownies: A Journey to the Perfect Batch
Hello, brownie lovers! If there’s one dessert that can light up a room and bring everyone together, it’s got to be brownies. These decadent, chocolatey delights are the epitome of comfort food—perfect for a cozy night in, a potluck with friends, or even when you just need a sweet pick-me-up. Today, we’re embarking on a delicious adventure to recreate homemade brownies that are so heavenly, they’ll have you craving more with each bite.
As your enthusiastic kitchen companion, I’m so excited to share my secret recipe for homemade brownies that are simple, straightforward, and oh-so-satisfying. But more than that, I want to share with you the love and nostalgia baked into every batch. So grab your apron, turn on that oven, and let’s bring some warmth into our kitchens!
Personal Story
Ah, brownies. When I think back to my childhood, I remember tumbling into the kitchen after school, the rich aroma of chocolate wafting through the air. My mom would often whip up a batch to celebrate the end of a school week or to soothe our worries when life felt a little too overwhelming. I can still picture her, apron tied around her waist, explaining every step while expertly melting chocolate and folding in ingredients like it was some kind of magical potion.
One of my fondest memories is how she would let me crack the eggs. I’m sure a few shells snuck into the bowl here and there and we definitely had some flour explosions, but those moments taught me the joy of cooking and the importance of sharing food with love. Whenever I bake brownies now, I can’t help but think of her sweet smile and our kitchen escapades. It’s a tradition that I happily carry on, spreading joy one brownie at a time!
Ingredients
Here’s what you’ll need to whip up these delightful homemade brownies, along with some helpful insights:
-
1 cup granulated sugar
- The backbone of sweetness here! Feel free to use brown sugar for a deeper flavor. It will also lend a bit of chewiness to the brownies.
-
1/2 cup unsalted butter, melted
- Butter is key for that rich, fudgy texture. If you’re in a pinch, coconut oil or a vegan butter can work wonderfully!
-
2 large eggs
- These help bind everything together. For egg-free brownies, you can use flax eggs or applesauce, but the texture may vary slightly.
-
1 teaspoon vanilla extract
- A splash of vanilla elevates the flavor beautifully. Use pure vanilla for the best results—your taste buds will thank you!
-
1/3 cup unsweetened cocoa powder
- This is where the chocolatey goodness comes from! Make sure you’re using unsweetened cocoa for the right balance of sweetness in the brownies.
-
1/2 cup all-purpose flour
- Flour helps provide structure. If you’re looking for gluten-free options, almond flour or a gluten-free all-purpose blend can work in a pinch.
-
1/4 teaspoon salt
- Salt brightens the flavor of chocolate (yes, really!), so don’t skip it!
-
1/4 teaspoon baking powder
- This little leavening agent adds just enough lift to make your brownies less dense. Omit it if you prefer a denser, fudgier brownie.
Step-by-Step Instructions
-
Preheat Your Oven: Start by preheating your oven to 350°F (175°C). This step is crucial because it ensures that your brownies bake evenly.
-
Prepare Your Baking Pan: Grease an 8×8-inch square pan or line it with parchment paper for easy removal later. A quick tip: if you spray the pan with a bit of cooking spray before laying down the parchment, it helps it stick!
-
Mix the Sugar and Butter: In a medium bowl, combine the melted butter and granulated sugar. Mix well until the sugar is fully incorporated into the butter, which should take about 1-2 minutes. Pro tip: mixing these two right after melting the butter enhances that delightful shiny crust on the top of the brownies.
-
Incorporate the Eggs: Crack in the eggs and pour in the vanilla extract. Continue mixing until everything is smooth and glossy. Remember, a good mixture means air is getting in, helping your brownies to rise a bit!
-
Add the Dry Ingredients: Sift the cocoa powder, flour, baking powder, and salt together over the mixture. Gently fold the dry ingredients into the wet ingredients using a spatula or wooden spoon until just combined. It’s okay if there are a few flour streaks; overmixing can lead to tough brownies.
-
Pour and Spread: Transfer the batter into the prepared pan, spreading it evenly. Don’t worry about perfection; rustic is the new beautiful!
-
Bake: Pop your brownies into the preheated oven and bake for 20-25 minutes. You want a toothpick to come out with a few moist crumbs attached, not clean. It’s the secret to that fudgy texture we’re all obsessed with!
-
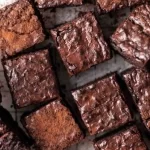
Cool and Cut: Allow the brownies to cool in the pan for about 10 minutes, then transfer them to a wire rack to cool completely. Once cooled, cut them into squares, and enjoy the fruits of your labor!
Serving Suggestions
These brownies are delicious as-is, but why not dress them up a little? Serve them warm with a scoop of vanilla ice cream on top, drizzle with chocolate or caramel sauce, or sprinkle with sea salt for a gourmet touch. A dusting of powdered sugar adds a snowy finish that’s just as lovely!
Recipe Variations
- Nutty Addition: Toss in some chopped walnuts or pecans for a delightful crunch.
- Mint Chocolate Brownies: Add a teaspoon of peppermint extract for a refreshing twist—perfect for the holidays!
- Extra Decadent: Swirl in some peanut butter or Nutella for a luxurious twist.
- Dairy-Free: Use almond or soy milk in place of the butter and substitute eggs with flax eggs for a vegan version.
- Gluten-Free: Swap out the all-purpose flour for a gluten-free blend to accommodate dietary needs.
Chef’s Notes
Brownies have always held a special place in my heart, and I’ve experimented with countless variations over the years. I remember the first time I tried adding espresso powder—it gave the brownies a rich depth that had everyone raving! Cooking is all about experimentation, and don’t be afraid to make this recipe your own. Over time, my adaptation of brownies has turned into an evolving project that reflects my tastes and the flavors I adore.
Remember, even if your brownies don’t come out perfectly the first time, they’ll still taste amazing! Just think of them as perfect little chocolatey hugs.
FAQs and Troubleshooting
What if my brownies are dry?
If your brownies turned out dry, it’s likely they were baked too long. Keep an eye on your baking time, as every oven is different. The toothpick test is your best friend!
Why didn’t my brownies rise?
If your brownies are too flat, it could be due to the leavening agents. Make sure your baking powder is fresh, and always measure your ingredients accurately to ensure the perfect rise.
Can I chill brownies for a firmer texture?
Absolutely! Chilling brownies for a couple of hours can help them firm up, making them easier to cut into neat squares. Just be sure to cover them well!
How do I store my leftovers?
You can store brownies in an airtight container at room temperature for 3-4 days. For longer freshness, pop them in the fridge or freeze them for later sweet cravings!
Nutritional Info (Optional)
While I love enjoying these brownies, it’s good to keep in mind that they are a treat! A standard homemade brownie (about 1 square from an 8×8 pan) has approximately:
- Calories: 150
- Total Fat: 7g
- Saturated Fat: 4g
- Carbohydrates: 22g
- Fiber: 1g
- Sugars: 10g
- Protein: 2g
Enjoy them in moderation and savor every delicious bite!
And there you have it, your definitive guide to making homemade brownies! Remember, cooking is about sharing love and creating memories, so have fun in the kitchen, and don’t forget to mess up a little along the way—it’s all part of the journey! Happy baking!
PrintHeavenly Homemade Brownies
Decadent homemade brownies that are fudgy, chocolatey, and perfect for any occasion.
- Prep Time: 10 minutes
- Cook Time: 25 minutes
- Total Time: 35 minutes
- Yield: 16 servings 1x
- Category: Dessert
- Method: Baking
- Cuisine: American
- Diet: Vegetarian
Ingredients
- 1 cup granulated sugar
- 1/2 cup unsalted butter, melted
- 2 large eggs
- 1 teaspoon vanilla extract
- 1/3 cup unsweetened cocoa powder
- 1/2 cup all-purpose flour
- 1/4 teaspoon salt
- 1/4 teaspoon baking powder
Instructions
- Preheat your oven to 350°F (175°C).
- Prepare an 8×8-inch square pan by greasing it or lining it with parchment paper.
- Mix the melted butter and granulated sugar in a medium bowl until fully incorporated.
- Incorporate the eggs and vanilla extract into the mixture until smooth and glossy.
- Add the sifted cocoa powder, flour, baking powder, and salt, then gently fold until just combined.
- Pour the batter into the prepared pan and spread it evenly.
- Bake for 20-25 minutes, until a toothpick comes out with moist crumbs.
- Cool in the pan for 10 minutes, then transfer to a wire rack, cool completely, and cut into squares.
Notes
Serve warm with ice cream or drizzle with sauce for a gourmet touch.
Nutrition
- Serving Size: 1 brownie
- Calories: 150
- Sugar: 10g
- Sodium: 50mg
- Fat: 7g
- Saturated Fat: 4g
- Unsaturated Fat: 2g
- Trans Fat: 0g
- Carbohydrates: 22g
- Fiber: 1g
- Protein: 2g
- Cholesterol: 30mg
Keywords: brownies, dessert, chocolate, baking, homemade